Fashionable debris
How to change the skin of a 3D model

Entering Winnowing Pass...
My Wheel Of Karma: A Tulku Odyssey missionpack starts with the exploration of Winnowing Pass. As you can see it's all made of red rock. At one point I had to ask myself what color would be the debris of an exploding slab of rock. The breakable_brush property responsible for not only the color but also the type of debris (whether they look like blocks or shards, their number, the sound they make) is thingtype.thingtype is an integer within a range of predefined values, and the only ones corresponding to rocks are
1 : "Grey stone"Obviously, it didn't take me three hours to choose.
9 : "Brown stone"
Alas! When I launched the game to judge the effect, I saw the reddish brown rock explode with bouncing brown-yellowish fragments. Yuck! Of course I could have gotten by, but it looked so strange and off beam... Something could be done, so I did it.
Let's redo it together. First we need to extract the ttex017 rock texture with QuArK's Texture Browser toolbox. QuArK is a powerful tool but is sometimes quite disconcerting: extracting a texture is as simple weird as selecting Properties... in its right-click menu, then Save as... (without changing the default "Quake 1 texture" setting). Now we have a ttex017.pcx image file.
A quick look at the breakable_brush implementation in breakabl.hc informs us about the default function used to deal with a breakable_brush's "death": chunk_death.
self.th_die = chunk_death;chunk_death is a very generic function called in dozens of files and situations. It is defined in chunk.hc and is basically a long sequence of if/else if going through all the different possible values of self.thingtype to choose the right "death sound" before calling CreateModelChunks which has a similar if/else if sequence to create the appropriate debris, including that piece of code:
else if (self.thingtype==THINGTYPE_BROWNSTONE)
{
	if (final < 0.25)
		setmodel (chunk, "models/schunk1.mdl");
	else if (final < 0.50)
		setmodel (chunk, "models/schunk2.mdl");
	else if (final < 0.75)
		setmodel (chunk, "models/schunk3.mdl");
	else
		setmodel (chunk, "models/schunk4.mdl");
	chunk.skin = 1;
}
First lines define schunk1 to schunk4 as the 3D models for the small random bouncing blocks generated by the explosion. Last line sets their skin index to 1.Those models are stored in PAK0.PAK. Let's open each of them with QuArK:

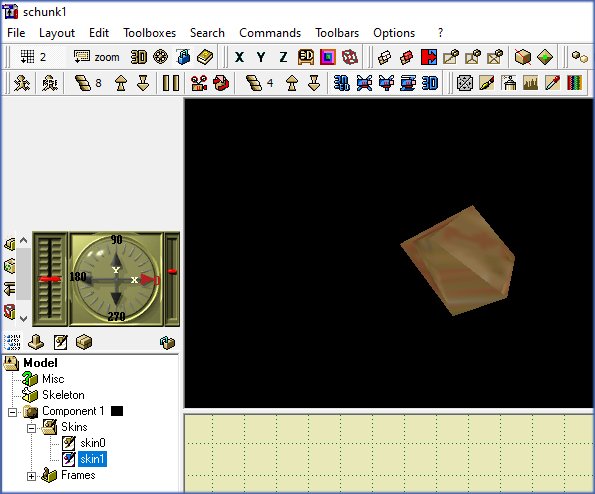
schunk1.mdl viewed in QuArK, skin1 selected
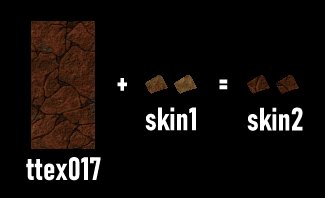
Depending on whether you click on skin0 or skin1 in the small tree view you'll see the model in grey or brown color. In-game, CreateModelChunks selects the former by setting chunk.skin = 0; when the breakable_brush's thingtype is 1 : "Grey stone" or the latter by setting chunk.skin = 1; when thingtype is 9 : "Brown stone", as we saw previously.Now it's time to add a third skin. Right-click on skin1, option Save Skin File, and we've got a skin1.pcx image file. Merging skin1.pcx with ttex017.pcx is no big deal and can be done easily in any graphics editor.

The skin looks pretty pixelated,
yet it's perfectly anti-aliased once projected onto the model.
- Close the model editor and go back to the model list in QuArK to save schunk1 to schunk4 as standalone mdl files (once again through that right-click Properties... option).
- QuArK had been launched to open PAK0.PAK and keeps it as its "primary target". So we have to close it completely.
- Let's relaunch QuArK, this time just for opening schunk1.mdl (thus retargeting QuArK on that specific file).
- Open QuArK's Texture Browser and import the newly created skin2.pcx file through menu Edit\Import files\Import (copy) files...
- Right-click on the imported pcx, then click Open. Don't pay attention to the warning and click OK.
- Normally the pcx was added to the model as a new skin. A message box might pop up telling "No Current Component! You must first select a component to receive this item then try again.", in which case clicking on Model in the model editor's tree view usually does the trick.
- Save the modifed mdl file.
- Close QuArK. It will probably propose to keep track of the modifications you've done by saving a qrk file but you don't need to so click No.
- Reproduce steps 3 to 8 for each model. QuArK seems to prefer having just one session running at a time.
Now back to the initial rocky problematics, there are a few steps left to do. First of course, we must place the modified mdl files in our mod's models subdirectory. Then edit the HexenC code in order to be able to choose skin2 instead of skin1 when thingtype is 9 : "Brown stone". Here is a possible way of doing so (modified code in blue):
else if (self.thingtype==THINGTYPE_BROWNSTONE)
{
	if (final < 0.25)
		setmodel (chunk, "models/schunk1.mdl");
	else if (final < 0.50)
		setmodel (chunk, "models/schunk2.mdl");
	else if (final < 0.75)
		setmodel (chunk, "models/schunk3.mdl");
	else
		setmodel (chunk, "models/schunk4.mdl");
	if(self.skin)
		chunk.skin = self.skin;
	else
		chunk.skin = 1;
}
Skin 1 is still the default choice but can now be overriden by the breakable_brush's skin property's value specified in TrenchBroom, if any (it will be "2" in our case). This implementation would possibly allow to design dozens of different skins and would still work, as long as we set thingtype to 9 and the predefined "death sound" and debris models for that type keep being suited.Eventually that seemed lots of work for a very discreet tweaking. My reddish debris didn't happen to be spectacular at all, and I'm pretty sure nobody will ever notice, unless they read this tutorial. Was it worth? Yes definitely. Because I have the satisfaction of a job well done, and even if no one notices, on the other hand if I hadn't done anything, that's where one may have noticed that something was looking wrong with the color of the debris. And although that was lots of reading because I can't help being talkative and explaining everything, actually the procedure is pretty quick and straightforward once you've understood it.
Last but not least, reskinning models can of course produce far more striking results. So it's up to your creativity now!

Want to ask for clarification, report an issue with this trick or propose another one? Drop me an email  If you use the trick please credit me and put a link to this website.
 If you use the trick please credit me and put a link to this website.
 Inky's Hexen II Mapping Corner...